I use machine learning to colourify some old B&W photos of Sheffield I found online, and then upscale them to twice the resolution so they’d not lose detail in HD.
I then used GIMP to adjust the exposure, white balance and cleaned up the brightness and contrast, but did not alter the image in any way.
The (free) tools I used
DeOldify (https://bit.ly/deoldifyimages)
This tool is a Jupyter notebook that will take your black and white images from a URL, and use Machine Learning to colourise it for you
There’s also DeOldify Videos (https://bit.ly/deoldifyvideos) which will do the same thing, but with video footage – I didn’t use this for this particular project, but plan to make a video on it soon.
Zyro Image Upscaler (https://zyro.com/tools/image-upscaler) – because some of the source pictures were quite small- when stretched to fit the size of the 1080p video, they would appear pixelated.
Zyro is a free tool that uses machine learning to upscale your image (to around double the resolution)
The Process
First, I started by finding various black and white images of Sheffield from places like DuckDuckGo Images and Pinterest, I saved them all to a folder on my computer: the source images were all different resolutions and qualities – this is why the style looks inconsistent.
Once I have the images downloaded, I uploaded them to a folder on my server, so that I could provide the exact URLs in DeOldify, without having to worry about hitting hotlink barriers from the original images.
I purposely did not remove watermarks because I think that’s a really crappy thing to do.
One by one, I ran the process on each image, I could’ve quite easily written in a for loop to +1 the number of the filename, but didn’t want to automate it because I knew that all the images were different, and would require tweaking individually.
Using DeOldify
DeOldify uses machine learning to colourise your photographs, so it requires a sets of data that has already been trained, and it will use that knowledge of what it has learnt to give you its final result.
It is possible to download it and run on your own machine, which is great if you have a graphics card that costs about the same as a second hand car, but how we will be doing it is through a Google Cloud instance – we’ll be using Google’s computing power to process the image.
With the DeOldify link, we can do this from the Jupyter Notebook within our browser:

You’ll need to press the play button on each section sequentially to prepare the virtual environment by installing the required repositories.
Sign in to Google, and press the play buttons one by one to prepare the Google Cloud session, and install the required software onto your Google-hosted cloud computing instance.
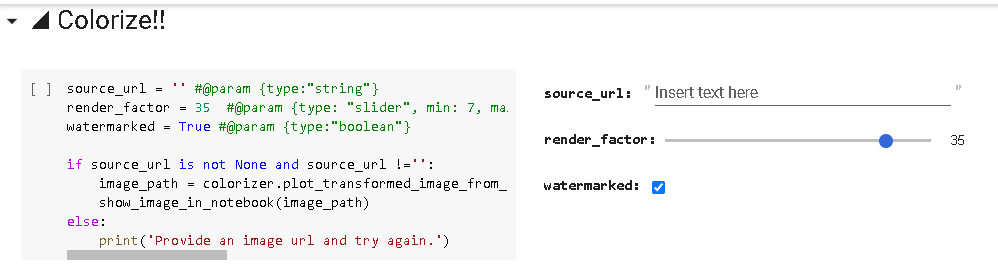
When you get to this section, providing you do not have any errors – you’ll be able to enter a URL for DeOldify to process in the source_url section.
Theoretically, you can find any black and white image you want to process, right click it and Copy Image Location (may be worded slightly similarly depending on which browser you use) and paste it into here.
The render_factor slider kind of works like colour saturation, if it’s too low – the colour changes will barely be visible, but if it’s too high – the colour saturation will be too high, and would spill out of your mesh.
I’ve found with the set of images I use, somewhere between 25 and 35 will give you best results, play with it and see what works for you: again, with the variation of images I used – I needed to tweak it for each individual image.
Once you’ve hit play on this section, there’ll be a little delay – and it will show you your colourised image, and below it – a comparison of the original image and your image.
Right click, and save the output image: if you want to save the side by side comparison, you can do that too the same way.
I saved it into a ‘processed’ folder on my hard-drive to keep them separate from the black and white originals. which were in a ‘source’ folder.
Remember that DeOldify will only save the image at the same resolution as the source picture, a lot of the images I used were below 1000 pixels large, but my output resolution for this video will be 1920×1080, twice the size of that.
Zyro Image Upscaler
If I used the images as-is, they’d appear pixelated and unclear when displayed on a HD screen, so I used the Zyro Image Upscaler, another machine learning tool to try to upscale the images.
The interface is simple, you can just drag an image onto it – and it will do the rest for you -once complete, it will show you a preview of the upscaled image – and if you follow the route to download it, it will ask for your email address so that it can send a link to the full size image to you.
I wasn’t keen on that idea, especially since I had 22 images to process, so cheekily right clicked on the image it had offered me, and selected to Open in New Tab.
Surprisingly, it gave me the full size version in a new browser tab anyway without having to enter my email address, so I just saved that and used it in my video.

Recent Comments